Adding schema markup
This article is to help GeoTheme users add schema markup (schema.org) to their directories it will be added to as and when I have time so please be patient.
it is relevant to add sites and blogs but certain parts will only be relevant to GeoTheme.
In the mean time here is the starting point. Test Pages of my directory site with the Google tool and compare to your own as you go on my directory site The Bathroom Home Directory.
Home page:
All you can do here is add into your header for Google + and declare you are a website.
So in your header.php download it from the GeoTheme directory.
Open it in a plain text editor.
|
1 |
<body <?php body_class(); ?> > |
|
1 |
<body <?php body_class(); ?> itemscope itemtype="http://schema.org/WebPage"> |
Next add in your Google + publisher details.
|
1 |
<link rel="pingback" href="<?php bloginfo('pingback_url'); ?>" /> |
|
1 |
<link href="https://plus.google.com/113364869645551722958" rel="publisher" /> |
This next part is used for multi author blogs like Geotheme. Although it will work fine for any other single author WordPress blog.
You could use a link similar to above for author rather than a php query like below just change publisher to author.
|
1 2 |
<?php if ( get_the_author_meta( 'gplus' ) ) { ?> <link rel="author" href="<?php the_author_meta( 'gplus' ); ?>" /><?php } // End check for gplus ?> |
Save and upload the file to your child theme directory.
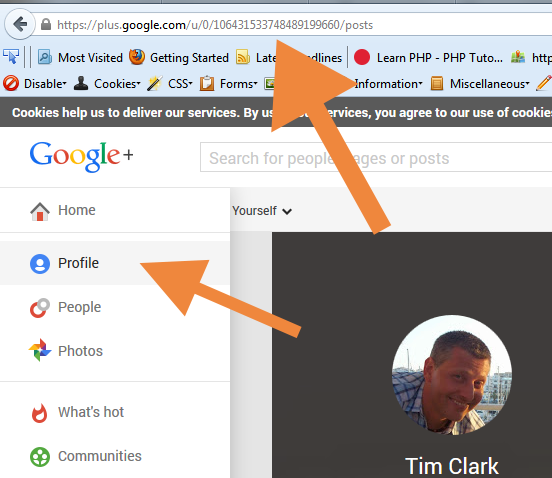 If you are not sure where to get you publisher id, visit your Google + account and click on profile look for the long number.
That should then test you page with the schema markup testing tool.
Hopefully all should be good on the home page, also you will notice that if you have any place, event pages that someone has added where the have filled out the Google + details in their profiles the author schema markup should show as well.
I will add to this post soon to do some more for your breadcrumbs and other items for schema rich snippets like ratings etc….
*Addition
I have noticed that in Blog category pages The Google structured data tool was recording the author details multiple times for each except that was being shown purely because it has rel=author then it was echoing the author link, so I found an easy way to deal with this is altering the blog_listing.php (GeoTheme) template which is very common in all blogs to have.
|
1 2 3 4 |
<h2><a href="<?php the_permalink() ?>" rel="bookmark" title="<?php _e('Permanent Link to');?> <?php the_title_attribute(); ?>"> <?php the_title(); ?> </a></h2> <p class="date"> <?php _e('By');?> <?php the_author_posts_link(); ?> <?php _e('at');?> <?php the_time('F j, Y') ?> | <?php the_time(); ?> | <a href="<?php the_permalink(); ?>#comments"><?php comments_number(__('0 Comment'),__('1 Comments'), __('% Comments')); ?> </a> </p> |
This will echo out on the page your author page url, which now Google knows who you are and your G+ id, so the simple solution is to alter it from a link to just your name by using instead the below.
|
1 2 3 4 |
<h2><a href="<?php the_permalink() ?>" rel="bookmark" title="<?php _e('Permanent Link to');?> <?php the_title_attribute(); ?>"> <?php the_title(); ?> </a></h2> <p class="date"> <?php _e('By');?> <?php the_author(); ?> <?php _e('at');?> <?php the_time('F j, Y') ?> | <?php the_time(); ?> | <a href="<?php the_permalink(); ?>#comments"><?php comments_number(__('0 Comment'),__('1 Comments'), __('% Comments')); ?> </a> </p> |
If you want to be notified follow my tweets below.